Using .NET Extensions to do Dependency Injection in Xamarin.Forms
.NET Extensions aren't just for ASP.NET Core. They actually provide many things that can be very useful in a Xamarin.Forms app including app configuration and dependency injection. In this post we will explore how to use the .NET Extensions dependency injection services in a Xamarin.Forms app.

I always like to evolve my architectural approach and so each time I start a new Xamarin.Forms project I try new techniques. On my most recent project I decided to give the .NET Extensions (aka Microsoft.Extensions) a try, specifically the dependency injection (DI) component. I really liked it. First of all, I like that it is a Microsoft package - just like Xamarin.Forms. I also like the fact that it's a familiar API to those coming from the ASP.NET Core world.
Why?
The Xamarin.Forms toolkit includes a dependency service, why not just use that?
The dependency service that comes in-the-box (DependencyService) is nice but it is not great and it doesn't scale. In my book, Mastering Xamarin.Forms (http://book.sndr.io/), I have an entire chapter dedicated to DI in a Xamarin.Forms app architecture. In that chapter I cover the benefits and importance of DI in a mobile app and I also discuss what I see as some shortcomings with the Xamarin.Forms DependencyService (spoiler alert: my main issue is the lack of constructor injection). I used the Ninject DI library in the book but there was no particular reason for selecting that library - the main focus of the chapter is not a specific implementation but the general benefits of using a DI library with Xamarin.Forms.
So, with that in mind, let's dive into some code and explore using .NET Extensions dependency injection with Xamarin.Forms!
Getting started
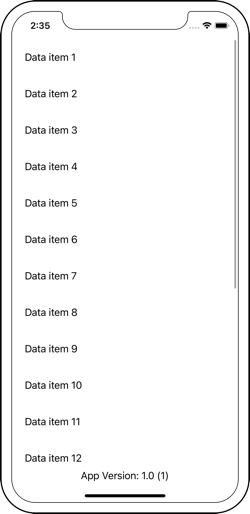
To demonstrate the use of the .NET Extensions DI library I've created a basic Xamarin.Forms app that simply displays some data along with the app's version and build number on the main page.

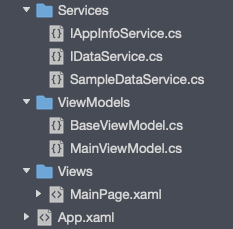
The app consists of a main page along with a ViewModel. It also contains two services, one for getting the sample data and one for getting the app's version and build info. Each service is defined by an interface (e.g., IDataService).

Typically, apps will have several services, some that rely on platform specific APIs and some that don't. This sample app has one of each. The service that retrieves the app's version and build info relies on platform specific APIs. The service that retrieves the sample data only relies on basic .NET APIs - in most real apps this service would actually get the data from a backend web service.
It's important to note the difference between these two types of services (platform specific vs platform agnostic). The platform agnostic service will be implemented in the core project where the dependency registration takes place. However, the platform specific service will not be implemented in the core project, it will be implemented in each of the platform projects. We'll see why this is important later in the post when we start registering our service dependencies.
Getting an app's version and build strings is one of the most simple platform specific APIs I can think of so it's perfect for this example. Yes, I know Xamarin.Essentials includes APIs for this and that is what I would typically use.
In the following sections we'll walk through setting up a dependency container, registering these services into that container and how to access them from the ViewModels via constructor injection.
Container setup
Like most libraries in .NET, the .NET Extensions are made available via NuGet packages. So, before we do anything we need to add the Microsoft.Extensions.DependencyInjection NuGet package to the app's core project and each of the its platform projects:
<PackageReference Include="Microsoft.Extensions.DependencyInjection"
                  Version="5.0.1" />
The .NET Extensions DI library works a lot like most other DI libraries - create a container, register services into the container, and resolve services from the container. The best place to put this "container" is in the App class, as shown in the following steps, since it is created early and accessible by other areas of the core app code.
- Add a new protected
IServiceProviderproperty to theAppclass:
protected static IServiceProvider ServiceProvider { get; set; }
This property will be our app's dependency provider/container.
- Add a new private method to the
Appclass that will be responsible for setting up the dependency provider/container:
void SetupServices()
{
    var services = new ServiceCollection();

    // TODO: Add core services here

    ServiceProvider = services.BuildServiceProvider();
}
- Update the
Appclass constructor to call theSetupServices()method created in the last step. This should be before settingMainPage:
public App()
{
    InitializeComponent();

    SetupServices();

    MainPage = new Views.MainPage();
}
Dependency registration
As explained earlier in this post there are two types of services (platform specific and platform agnostic). These are registered in two different ways because of how (and where) they are implemented in relation to the actual dependency container (the IServiceProvider created in the previous section).
The data service is platform agnostic and therefore it is implemented in the core project so it can easily be registered from the App class since its implementation is known (i.e., the App class is capable of instantiating it). To register the data service into the dependency container we simply need to update the SetupServices() method in the App class as follows:
void SetupServices()
{
    var services = new ServiceCollection();

    // Add core services
    services.AddSingleton<IDataService, SampleDataService>();

    ServiceProvider = services.BuildServiceProvider();
}
Registering the app info service won't be as direct. Since it's a platform specific service it needs to be registered from its respective platform's code. The way I like to do this is by providing a service registration "delegate" as part of the App constructor so when the platform specific app startup code (e.g., AppDelegate, MainActivity) instantiates the App it can provide a way of registering its platform specific dependencies.
There are a few ways to accomplish this, my preference is to use an optional Action parameter that takes an IServiceCollection argument, as laid out in the following steps:
- Update the
Appconstructor to take an optionalAction<IServiceCollection>parameter:
public App(Action<IServiceCollection> addPlatformServices = null)
{ ... }
- Update the
SetupServices()method to also take an optionalAction<IServiceCollection>parameter:
void SetupServices(Action<IServiceCollection> addPlatformServices = null)
{ ... }
- Update the
Appconstructor to pass itsaddPlatformServicesparameter on to theSetupServices()method:
public App(Action<IServiceCollection> addPlatformServices = null)
{
    InitializeComponent();

    SetupServices(addPlatformServices);

    MainPage = new Views.MainPage();
}
- Update the
SetupServices()method to call theaddPlatformServicesActionif defined, passing into it theIServiceCollectioncreated at the beginning of the method:
void SetupServices(Action<IServiceCollection> addPlatformServices = null)
{
    var services = new ServiceCollection();

    // Add platform specific services
    addPlatformServices?.Invoke(services);

    // Add core services
    services.AddSingleton<IDataService, SampleDataService>();

    ServiceProvider = services.BuildServiceProvider();
}
- Add a private static method to each of the platform specific Xamarin.Forms app startup routines that will be responsible for registering the platform specific services:
static void AddServices(IServiceCollection services)
{
    services.AddSingleton<IAppInfoService, AppInfoService>();
}
To be clear, the above method needs to be added to the AppDelegate class in the iOS project and to the MainActivity class in the Android project.
- Update each of the platform specific Xamarin.Forms app startup routines to provide the service registration
Actionwhen instantiating theApp(this will be the method added in the previous step):
// In the iOS app's AppDelegate class
public override bool FinishedLaunching(UIApplication app, NSDictionary options)
{
    global::Xamarin.Forms.Forms.Init();
    LoadApplication(new App(AddServices));

    return base.FinishedLaunching(app, options);
}

// In the Android app's MainActivity class
protected override void OnCreate(Bundle savedInstanceState)
{
    // ...

    global::Xamarin.Forms.Forms.Init(this, savedInstanceState);
    LoadApplication(new App(AddServices));
}
At this point we have created a container for our service dependencies and a place early in the App creation process to register our services into that container. Now we need a way of resolving those dependencies back out of the container so they can be used, mainly in ViewModels but potentially in other places.
Dependency resolution
My preferred way of getting dependencies into ViewModels is via constructor injection. In order to do that we just need to register our ViewModel into the same container and then any services listed in their constructor parameters will be resolved automatically from the container when that ViewModel is instantiated or resolved from the container.
Since the ViewModels live in the core project we can register them into the container in the same place we registered the data service, in the SetupServices() method:
void SetupServices(Action<IServiceCollection> addPlatformServices = null)
{
    var services = new ServiceCollection();

    // Add platform specific services
    addPlatformServices?.Invoke(services);

    // Add ViewModels
    services.AddTransient<MainViewModel>();

    // Add core services
    services.AddSingleton<IDataService, SampleDataService>();

    ServiceProvider = services.BuildServiceProvider();
}
Notice how we're registering the ViewModel as a transient and not a singleton like the other services. Typically it is not a good idea to make ViewModels singletons since they are used as data context for specific Page instances. For more info on service registration lifetime and scope checkout the docs.
Now we can update our ViewModel's constructor to include its required services:
public MainViewModel(IAppInfoService appInfoService,
                     IDataService dataService)
{
    // ...
}
Now that our services will automatically be resolved by ViewModels via the ViewModel constructors, the question is... How do we resolve the ViewModels for our Pages? One approach is to have the Page call the ServiceProvider directly, but I purposely made that protected to keep the actual DI implementation details from bleeding into other areas of the architecture. So, instead we will add a public static method to the App class to get a ViewModel from the container (the ServiceProvider):
public static BaseViewModel GetViewModel<TViewModel>()
    where TViewModel : BaseViewModel
    => ServiceProvider.GetService<TViewModel>();
Now our Pages can grab their ViewModel without any knowledge of the service container specifics. If for some reason we swapped out our container to some other DI container, the only thing to change would be this method... but the Page's wouldn't know any different.
Finally, we can update our main page to grab an instance of it's ViewModel from the container and set it as its BindingContext:
public MainPage()
{
    InitializeComponent();
    BindingContext = App.GetViewModel<MainViewModel>();
}
Conclusion
If you're going to use dependency injection in your Xamarin.Forms app, the .NET Extensions is a great option to consider. I really enjoy its clean, familiar API and this will likely be my goto DI library in future projects. It's also worth noting that the Xamarin.Forms team is considering .NET Extensions and the IServiceProvider as they plan the future of the product - .NET MAUI! ?
Additional resources / docs
- .NET Extensions dependency injection overview: https://docs.microsoft.com/en-us/dotnet/core/extensions/dependency-injection
- Xamarin.Forms DependencyService: https://docs.microsoft.com/en-us/xamarin/xamarin-forms/app-fundamentals/dependency-service/introduction
- Dependency Injection pattern: https://martinfowler.com/articles/injection.html
- MVVM pattern in Xamarin.Forms: https://docs.microsoft.com/en-us/xamarin/xamarin-forms/xaml/xaml-basics/data-bindings-to-mvvm
Thanks for reading! If you're interested in learning more about DI or other Xamarin.Forms architectural concepts checkout my book Mastering Xamarin.Forms 3rd edition and be sure to follow me on twitter @edsnider.
