How To Fade An LED With PWM in Windows IoT
Motors, dimmable LED's, speakers, multi-color LED's and a variety of other components have a requirement that's easy for an Arduino, but that turns out to be a little tricky in Windows IoT.

This is the second article in a series exploring Windows IoT on a Raspberry Pi. In this post we'll describe PWM, discuss how to perform simple binary GPIO manipulation, and then dig into configuring a device to fade an LED using Pulse Width Modulation (PWM).
Pulse Width What?
Microcontrollers such as Arduino and System on Chip (SoC) devices such as Raspberry Pi can technically only output one of exactly two voltages on their General Purpose I/O (GPIO) pins: either 0 or 3.3 volts. The problem is that many components such as speakers or multi-color LED's require not two, but a whole range of voltages.
Microcontrollers or SoC devices typically fulfill the requirement by switching a pin on and off so fast as to give the appearance to most components as being between the min and max. For instance to get ~3.0 volts you keep the duty cycle, or the proportion of time the pin is at High at 90%. This process is known as Pulse Width Modulation or PWM.
The following diagram from Wikipedia is a beautiful illustration of how to accomplish a sine wave using PWM. Hooking this output up to a speaker would produce a decent sounding continuous tone.

The problem is that PWM can be tricky for devices with non-realtime operating systems, because an OS can't just pause it's pin switching process to do a garbage collection or preemptively give some other process CPU time. Consequently, until recently Microsoft required you to get an external board if you wanted to output variable voltages in its fledgling Windows 10 IoT operating system.
However, as of version 10.0.10586.0 there is a way. That way is called Lightning Providers, but getting it working is a little tricky, and the documentation is scattered and doesn't work out of the box.
Binary GPIO
Before we get into how to do PWM, this series has yet to touch on regular binary GPIO manipulation. Fortunately it's fairly simple and well documented. Assuming you've got a hello world Windows IoT app, you can turn a pin high and then low like this:
gpioController = await GpioController.GetDefaultAsync();
if (gpioController == null)
{
    StatusMessage.Text = "There is no GPIO controller on this device.";
    return;
}
_pin = gpioController.OpenPin(22);
_pin.SetDriveMode(GpioPinDriveMode.Output);
_pin.Write(GpioPinValue.High);
await Task.Delay(500);
_pin.Write(GpioPinValue.Low);
Seems simple enough, it flashes an pin (and perhaps an attached LED) High for a half a second. But there are a couple of things to note.
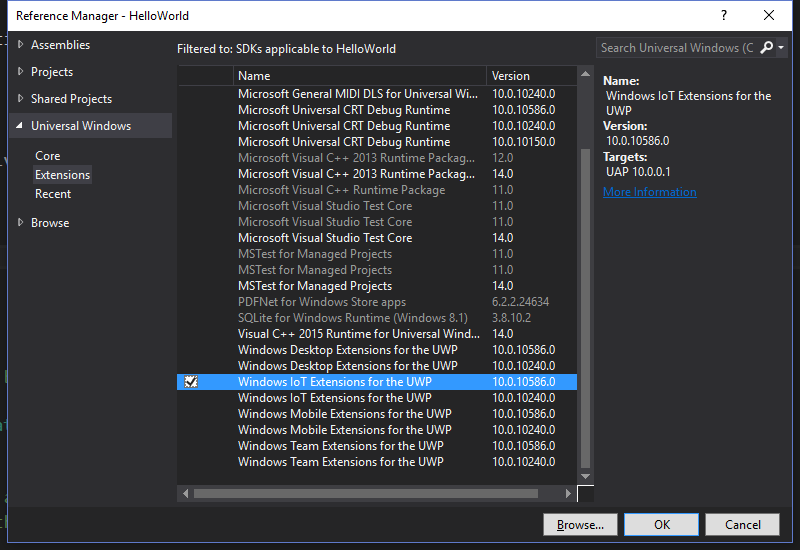
First GpioController is in Windows.Devices.Gpio, and it's only available when you reference Windows IoT Extensions for the UWP.
Second, GpioController.GetDefaultAsync() may return null if we're running this Universal Windows Platform project on a regular PC, or a phone, or an XBox. That's something to guard against.
Third, the pin 22 was (arbitrarily) picked from one of the Pi's available GPIO pins using the following diagram:

In other words, the above code will flash the 8th pin down on the left-hand side (aka the 15th pin).
Quick word of warning: if you test this out with an LED, make sure you get the polarity right, since LED's are not omnidirectional.
PWM
There are five steps to get PWM working.
1. Latest Bits
First, ensure you have the latest version of Windows IoT. Technically you only need the current public release of Windows IoT, aka Build 10586, December 2015. However, I tested this on the Pi 3, and since it's supposed to be 60% faster, your Pi 2 results may vary. For this reason I'm recommending you install the Insider Preview of Windows IoT, which I showed how to set up in the last post.
2. Lightning Driver
Second, you need to install the Lightning Direct Memory Mapped driver. Lightning is a new driver that provides a variety of additional capabilities including device and remote board PWM support. It's still in beta, and consequently there's a warning when you select it: "This option will reduce Windows security in exchange for performance using an in development driver".
To do change drivers:
- Navigate to the configuration url for your device (e.g. http://LeesRasPi3:8080/).
- Select Devices
- Under Default Controller Driver, select "Direct Memory Mapped Driver"

5. Reboot your device when prompted
3. Lightning SDK
Third, you'll need to reference the Lightning SDK. According to the documentation, you just reference via NuGet. Unfortunately, this doesn't work as of v1.0.3-alpha. I had to download the Microsoft.IoT.Lightning.Providers C++ source, add the Microsoft.Iot.Lightning.Providers.vcxproj project to my solution, and then make a project reference.
Incidentally, I contacted some folks at Microsoft, and they said a new nuget will be published shortly with binaries that will fix this issue.
4. Permissions
Next, Lightning providers require additional manifest permissions. To grant them you'll need to edit the Package.appxmanifest file of your UWP app and add the following bits inside capabilities at the end of the document:
<iot:Capability Name="lowLevelDevices" />
<DeviceCapability Name="109b86ad-f53d-4b76-aa5f-821e2ddf2141"/>
And then add the iot namespace to the Package element at the top of the document and iot to IgnorableNamespaces:
<Package
  xmlns="http://schemas.microsoft.com/appx/manifest/foundation/windows10"
  xmlns:mp="http://schemas.microsoft.com/appx/2014/phone/manifest"
  xmlns:uap="http://schemas.microsoft.com/appx/manifest/uap/windows10"
  xmlns:iot="http://schemas.microsoft.com/appx/manifest/iot/windows10"
  IgnorableNamespaces="uap mp iot">
5. PWM Code
Finally, we're ready for some code. One nice thing is that we can keep all of our existing binary GPIO code, plus allow the device to use either driver by simply adding the following line:
if (LightningProvider.IsLightningEnabled)
{
    LowLevelDevicesController.DefaultProvider = LightningProvider.GetAggregateProvider();
}
But, to get full on-device PWM functionality we'll need something like this:
if (LightningProvider.IsLightningEnabled) {
  LowLevelDevicesController.DefaultProvider = LightningProvider.GetAggregateProvider();

  var pwmControllers = await PwmController.GetControllersAsync(LightningPwmProvider.GetPwmProvider());
  var pwmController = pwmControllers[1]; // use the on-device controller
  pwmController.SetDesiredFrequency(50); // try to match 50Hz

  _pin = pwmController.OpenPin(22);
  _pin.SetActiveDutyCyclePercentage(.25);
  _pin.Start();
}
The first couple of lines set up the lightning driver and PWM provider using the on-device controller (as opposed to a dedicated PWM board, which you could attach to get better performance). It then requests a leisurely 50Hz frequency speed.
Finally it opens pin 22 and sets the duty cycle to 25%.
And that's it! With a scrollbar and a few extra lines of code you'll be able to get something like this:
Source Code
The complete code for this project is available on the WindowsIotPwmExample github project.
Summary
In this article we've covered what Pulse Width Modulation is, how to use Windows IoT to write binary-states to GPIO pins, and finally how to generate variable voltages using PWM. Keep an eye out for the next article in the series on how to turn a Raspberry Pi into an information radiator.